

I recently did a small workshop with a friend on
illustrating habitus (drawings that represent a whole specimen, usually in a
predefined view) for scientific work. One thing I hope to achieve by this post
is to get some of my drawings and art out of my system. The other reason is
that I might end up getting some constructive feedback and learning some new
things from eventual comments.
I believe that adobe illustrator is a sandbox tool and
almost any given task can be accomplished in several different ways. If the end
result is to equal standards it is not a wrong way of doing it. Where the
difference lies is in the ease of doing certain tasks. Drawing every single
setae (bristle or hair) on a spider leg is not the wrong way of doing it, but
making an art brush can significantly improve quality and save time on a
drawing.
There are hundreds of good tutorials for illustrator so I
will not be introducing the basic tools and short cuts. In general the more you
know the program the easier it is to solve many of the problems and challenges
you meet along the way.
The objective of the workshop is to teach show how to make a
quick sketch of an animal and how to draw with varying thickness of lines so as
not to get a drawing that has a too schematic look but more of a hand drawn
style.
My way of drawing is quite straightforward and it is only a
matter of how much effort (time) you want to put into it. The main point in the way I draw is that I am
actually not using vectored lines but spaces between shapes create lines. This
should become apparent from the description below. I hope you enjoy.
Basic outline
1.
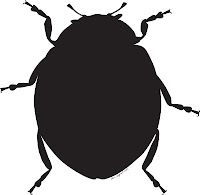
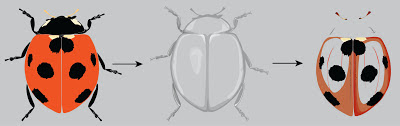
The first step is making a silhouette. The
silhouette is the base and what will create the color and lines, including the
outline of the drawing.
2.
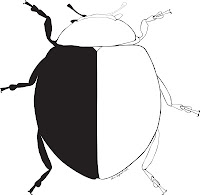
After the silhouette is done it is filled in
with shapes representing the different parts of the drawing. It is here that
you are able to define the thickness of the lines ao the distance between the
different shapes will decide how much of the dark silhouette shines through.


These two first steps should give you a nice outline where
you can now go in and select your line thicknesses. All this however can almost
also be done using lines and the line width tool or by making a line drawing
into an outline by selecting your path and making it into an outline (Objectà Path à Outline path). I might
start experimenting with this but the next steps work best for me when I have
the shapes and the silhouette.
Coloring and shading
3.
Coloring is rather straight forward. I select
the different shapes and try to match the a base color of the image with that
of my shapes.

4.
As a minimum I always try to use tree shade
gradients. There is also usually no
color selection in my shading, unless something actually does change color in
its darker form. What I do is I use the same color as my base (or black), but I
choose the multiply option in the transparency window and then adjust the
transparency if I need a lighter shade. I like this as I feel it gives me a
natural transition between the colors. Another reason I use multiply is that
multiplied colors do not ad to black and are therefore invisible when overlaid
on my outline meaning that I can make shadows that stretch over several
different areas of my drawing.
5. My basic method of creating a shadow is to select
the shape/s that I wish to shade, copy (ctrl c) and past in front (ctrl f) in
my shadow layer. I then draw the shade on top of my newly pasted shapes and
using the pathfinder options I subtract the shadow shape from my base shape.
This allows me to get the exact contour of my base shape without having to
painstakingly try to follow the base shapes outline.
6.
Highlights are done in the same way as shadows
except the color is white and it is not multiplied but simple a transparent
shape.

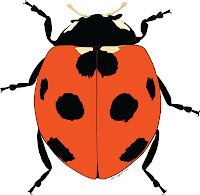
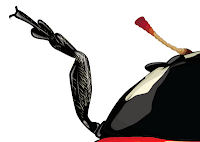
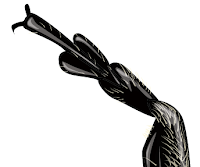
7.
The lady but image is in a rather low resolution
which means that the cuticle sculpturing cannot be replicated. The legs however
do have some visible setae that could be good to have in the final drawing. To
do these I created a art brush remembering to select (Brush scale options à scaling
proportionately) and (Colorization à
Method à
Tint). The setae are then drawn on individually using the brush tool.


Thoughts on my method
